How to Do a Content Audit
8th April 2021
One of my favourite types of project is working with a startup or new business that’s looking to invest in content. A blank content canvas if you will, where I can build a fresh strategy that has a strong structure and where each piece has a purpose.
But this is fairly rare.
Most content projects have some kind of content legacy. A blog or website, where content has been written by the intern, an ex Content Writer, or agency. Some sites can have acres of content but still not really understand where they’re ranking, or how they’re acquiring traffic.
So if you fall into the latter category, where do you start when it comes to organising your content strategy?
In this guide I wanted to write down how I approach a content audit and the tools I use (most of them free) to make decisions on how to keep, improve or merge existing content, to work towards an improved SEO strategy.
What is a content audit?
A content audit helps you to see what website content you have and learn how it’s performing in terms of your goals. Usually, a content audit looks at which content drives traffic to your website, which content converts users into leads or customers, and which content is performing badly in that it’s not converting leads, or isn’t ranking highly in search.
Tools you need for a content audit
The tools you’ll need for your content audit will depend on how large your site is. If you have under 100 pages/blogs, you could do the audit manually using free tools such as Google Analytics and Google Search Console, as I’ll show you below. However, if you have more than 100 pages or blog posts then I’d recommend using a paid tool such as ScreamingFrog, SEMRush or AHrefs for the initial audit.
If you’re also wanting to do a technical audit (which is different from the content audit shown here) then you’ll definitely need a paid tool to help.
You can also sometimes get free trials of these tools, for example ScreamingFrog will allow you to analyse and export up to 500 pages on its free version.
The benefit of using a paid tool is that you’ll get additional information about your site, such as identifying which pages have 404 errors, the site titles and meta descriptions of your pages (which can be optimised) and any canonicals or pagination. This is useful for an in-depth SEO audit and analysis, but if you’re just interested in looking at your content topics and search queries, you can begin with the below as a basic website content audit.
How to do a basic website content audit
Before you begin your content audit I would create an Excel spreadsheet or Google Sheet which will serve as the basis of your audit. Within this spreadsheet I’d create four tabs:
- Pages
- Blogs
- Queries
- Website roadmap

Often, I’ll also use this spreadsheet later for keyword and competitor research, which I cover more in my SEO strategy guide.
Here are the steps needed to audit your website content and create a spreadsheet of the results:
1. Determine which pages bring the most traffic to your site
In Google Analytics, set the date range to the previous six or 12 months and navigate to:
Google Analytics > Behavior > Site content > Landing Pages
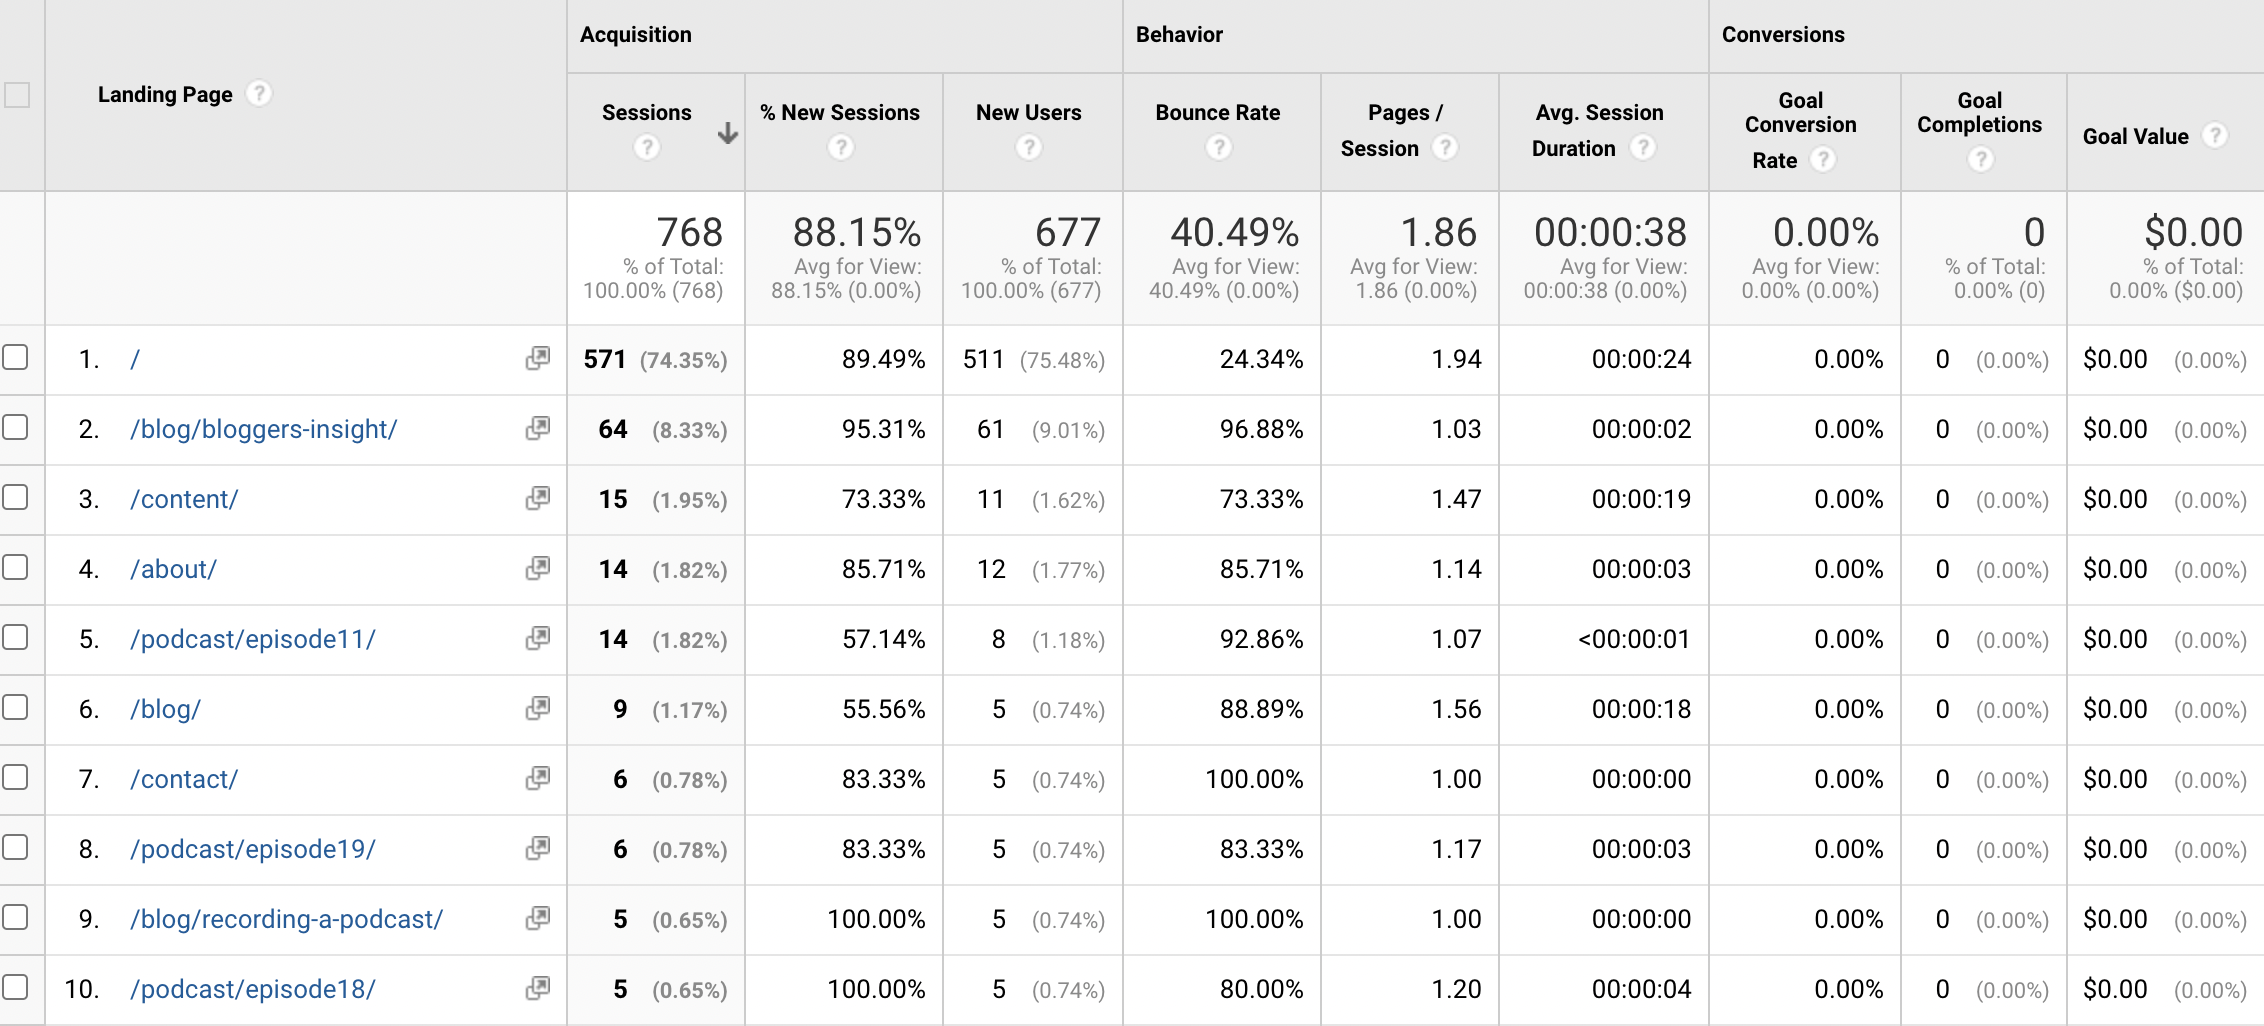
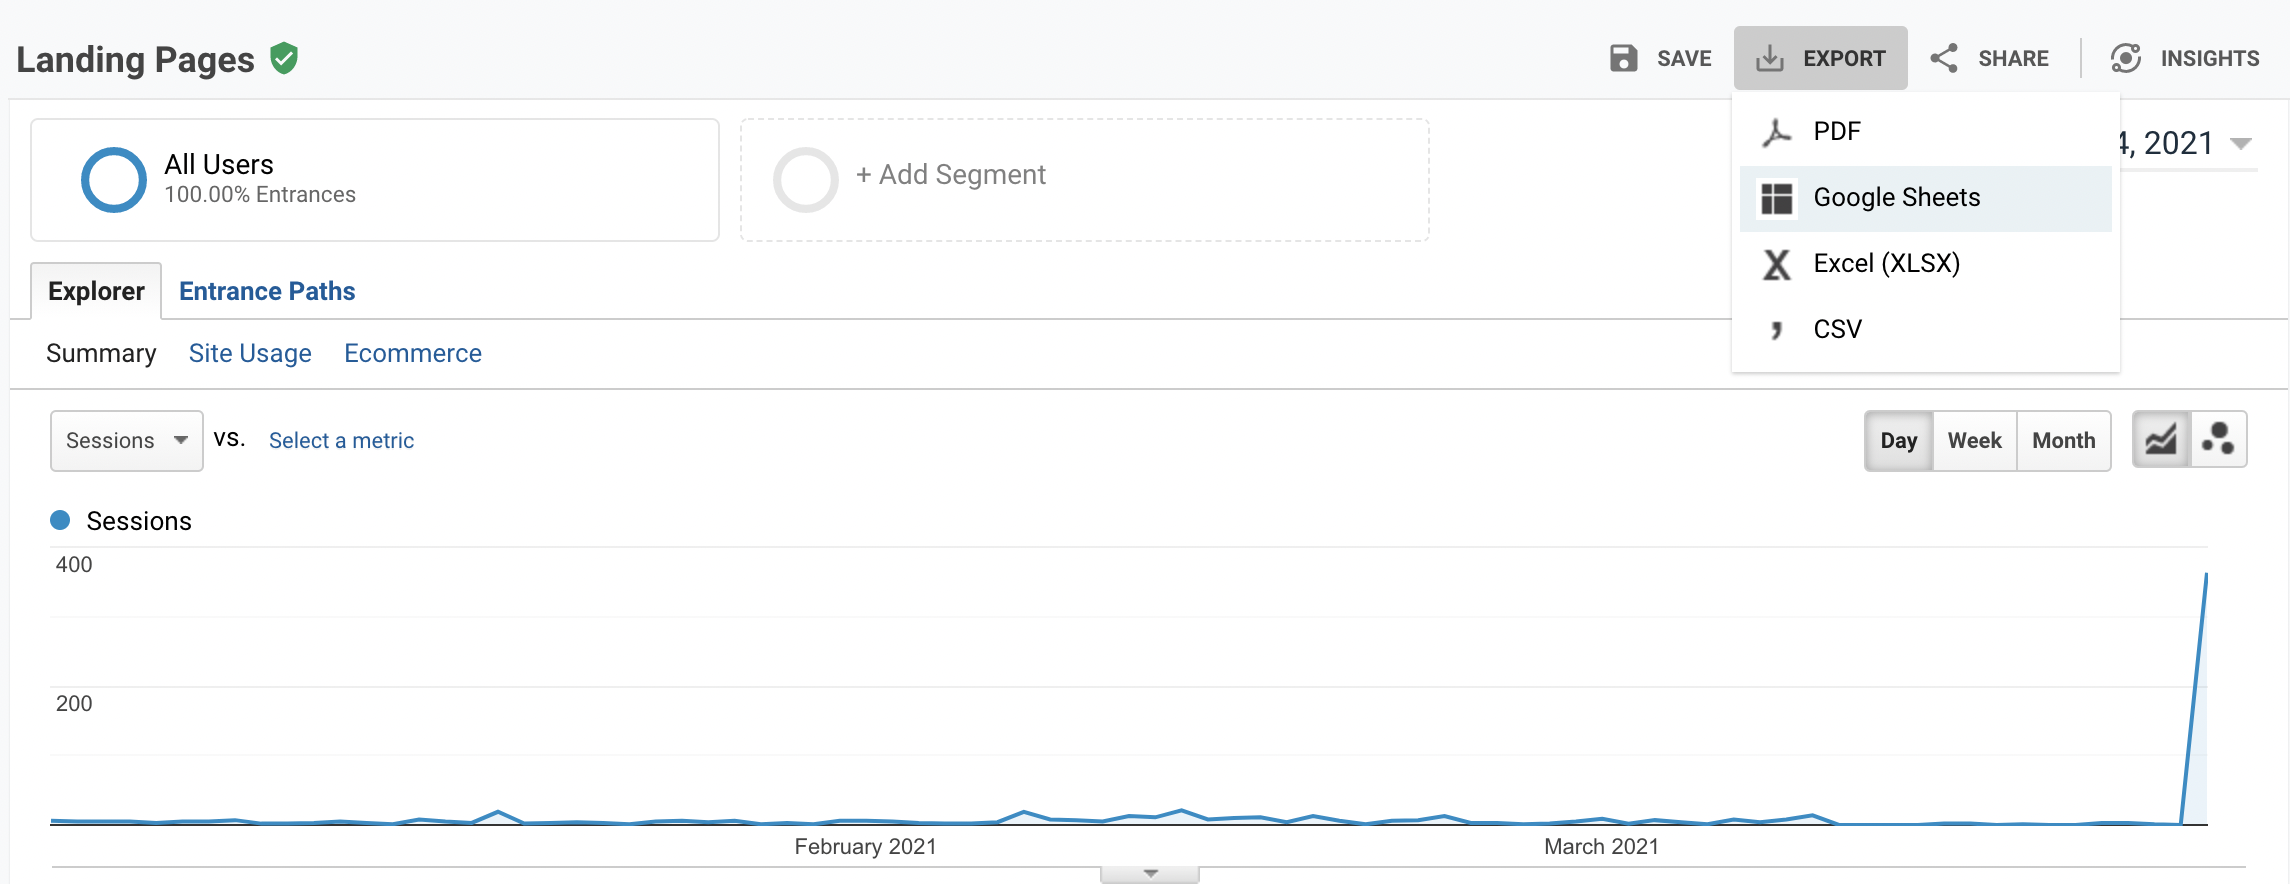
Next, under “Show rows” change this from 10 to 5000, to that you can see as many website pages as possible. Then select “Export” at the top of the page and export this data into a Google Sheet or Excel format. Copy this information into the master spreadsheet that you’re using for the audit under the “Pages” tab.
This view gives you insight into a few different areas of your website, as you can play around with sorting the columns to see:
- Which pages and blog posts bring in the most sessions
- Which pages and blog posts bring in the most new users
- Which pages and blog posts bring in the most conversions (if you have goals set up in GA for each time someone buys a product or fills in your enquiry form – and hopefully you do!)
From this data, you can begin to understand how effectively your website content is currently performing and which pages or blogs are the highest drivers of leads and/or traffic. This will be important in helping you make decisions about your existing website content and what you should keep, improve or add.
2. Determine which blogs bring the most traffic to your site
If you have a lot of blog content, I’d also recommend looking at this separately to your general overview of website pages. To do this, you’ll need to drill down in Google Analytics and navigate to:
Google Analytics > Behavior > Site content > Content Drilldown > /blog
Please note, if your blog section has a different permalink to /blog then look out for that instead (for example if the URL where you keep all of your blogs is www.hotyoga.com/culture then you would look in the drilldown for /culture).
Here, you should be able to view the blogs on your website by page views, which will allow you to see which are visited by the most readers.
You can increase the rows (up to 5000) to ensure you’ve covered all of your blog posts which are currently seeing traffic and then, as before, export this list into the master spreadsheet to review under the “Blogs” tab. As in the pages example above, you can then begin to see those blog posts that drive the most traffic or conversions on your website and those that are performing poorly.
3. Find out which content creates the most conversions
While traffic is one part of your content audit, seeing how much traffic individual blog posts bring to your site doesn’t give much indication to which ones actually convert. To find this out, you’ll need to have already set up Google Analytics Goals. Goals let you track back from the point of purchase, or enquiry, to the page the user visited before converting.
To find this information, you’ll need to visit:
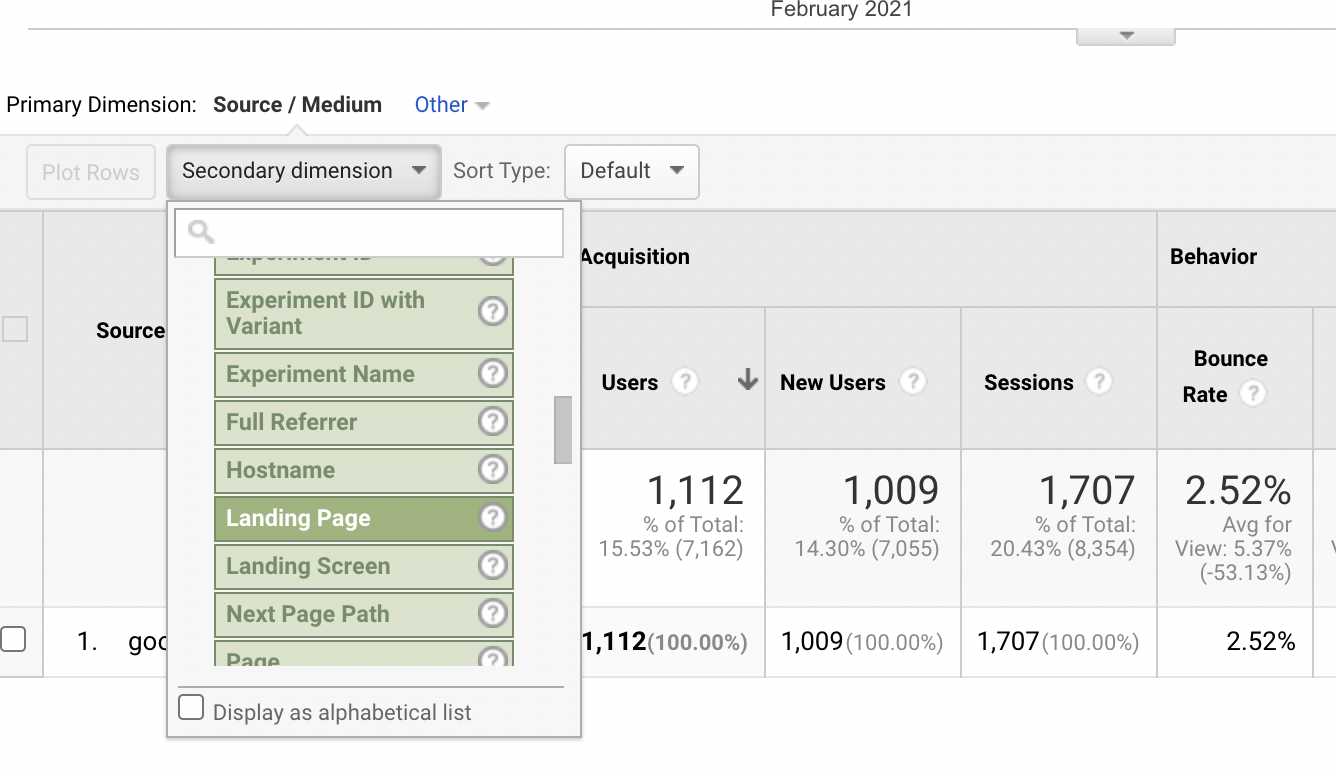
Goals > Overview > (Select the correct Goal) > Source/Medium > google / organic
Once you’ve made this selection, you can see all of the conversions that came from Organic search as a medium.
Now, we want to see which blog posts brought in the users that converted, so you’ll need to look for Secondary Dimension and then choose the criteria Behavior > Landing Page. This will provide a list of all the pages that a user entered by, before converting into a lead or customer.
How to provide attribution to blog posts
Attribution in content marketing is never that simple, is it? So when you’re carrying out this step, keep in mind that user behavior often means someone may click around on the site a bit more before they buy, and may even leave and come back again. This type of tracking isn’t an exact science, but should give you some insight into which blogs lead to conversion.
After this stage, you can add markers to your original spreadsheet to detail which blogs out of your list provide top traffic, and also have high conversion rates. There’s a lot to be gleaned from this analysis – if you have high traffic blogs which aren’t converting, you may want to make your call to actions clearer, or add a little more about your product or service. Similarly, if you have low traffic blogs with high conversion rates, this tells you something about those topics and how important they are to your target audience, so you may want to grow them as content pillars.
This might also depend on which part of the marketing funnel your blog sits in. Blogs written for the awareness stage of the funnel may not directly convert new users, but those written for the conversion stage should.
This is where I’d begin to make notes in the “Website roadmap” tab of your master spreadsheet. You can easily cover any blogs or pages which need updating or improving, or topic areas that you feel like you should expand on because you can see indicators of high performance.
5. Look at the queries your website ranks for
Now, head over to Google Search Console and, under the Performance tab, change the date range to “Last 12 months”. Select “Export” and save this ready to copy over into your master sheet.
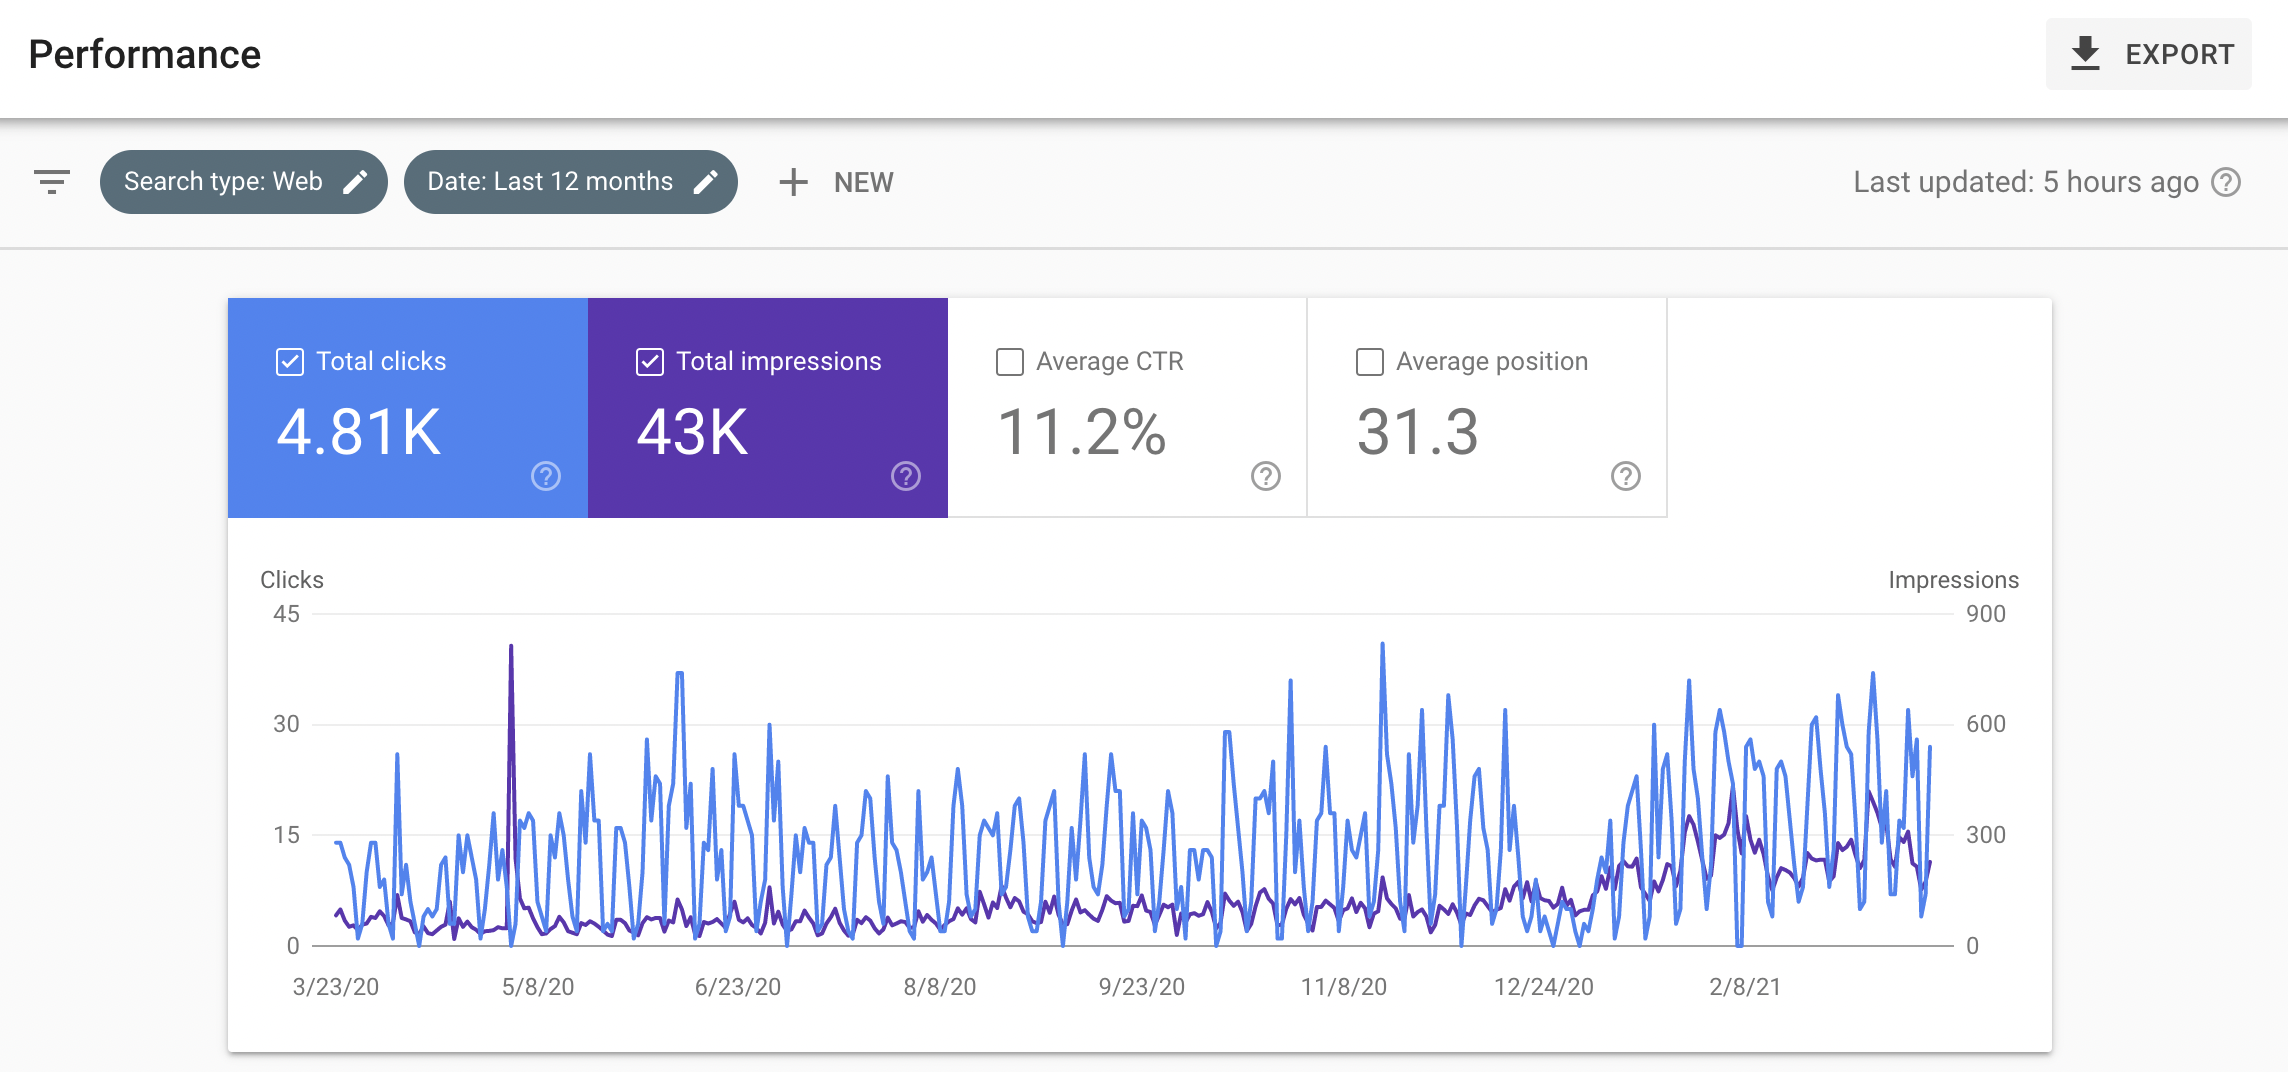
From this, you’ll be able to see a full list of all of the queries your website currently ranks for, and the average position they rank in.
I pay particular attention here to any queries which rank in positions 1-10, as this is generally the first page of Google, which receives 95% traffic. I’ll also pay attention to anything in positions 11-20, as these keywords are usually ripe for opportunity. For example, if you’re ranking in position 25 for a keyword, you could see which blog or page is ranking for that key term, see where you can improve it, or if there is other thinner content around that topic on your blog and merge it together. This may help push you from position 25 to position 15, which would make a huge difference to the amount of traffic and leads you would then receive.
See which pages rank for those queries
Within this step, I also begin to investigate which pages rank for each of the top positions 1-10 queries. For example, if my website was in position #8 for “tarot card reading” I would click through on that key phrase in Google Search Console and see which Pages are ranking for that term. Here you would likely have a range of pages, but perhaps your homepage is the page getting the most traffic or impressions.
This step is really important to help you determine whether you have multiple landing pages or blog posts competing for the same term. This is what I call “cannibalisation of content”, and I see it all the time.
Ranking on Google is now so competitive that it’s highly unlikely that three of your blogposts, which are all variations on the same theme, will rank in high positions for the same phrase. Instead, Google will pick the blog post it thinks is the best out of those three. However, this gives Google a lack of signposting, so rather than having one killer blogpost in position #2, companies will have three average blog posts in position #22, #33 and #39.
This is where merging and cleaning-up content can provide excellent results. For example, I would merge all of those three blogs into one “master” pillar piece of content for the key term and make that the very best piece of content ever. I would then merge any relevant content from the two redundant articles and redirect their URLs to the master pillar piece.
This would have an impact on my rankings and could move the blogpost from position #22 to position #8 or #9 because of how improved the content is, and how much easier it is for Google to understand who the different pages on your site are for.
6. Review where your content ranks in search results
Next, to get really granular and see where your content ranks, you can use Google Search Console. But be warned – this is a manual step! This said, I do feel that there is a real benefit to looking at your blog posts individually. It can really help you to understand how they perform, whereas when you do a mass export with a tool such as SEMRush, you end up just reviewing things at surface level.
Also, you could choose to do this step with just the top 10 or 20 blog posts on your site and you’d still learn a lot.
To see where your web pages rank and what they rank for, take your “Blogs” tab of the spreadsheet. Copy the URL of an individual blog and in Google Search Console, under the Performance tab, choose New > Page and then paste in your blog post URL.
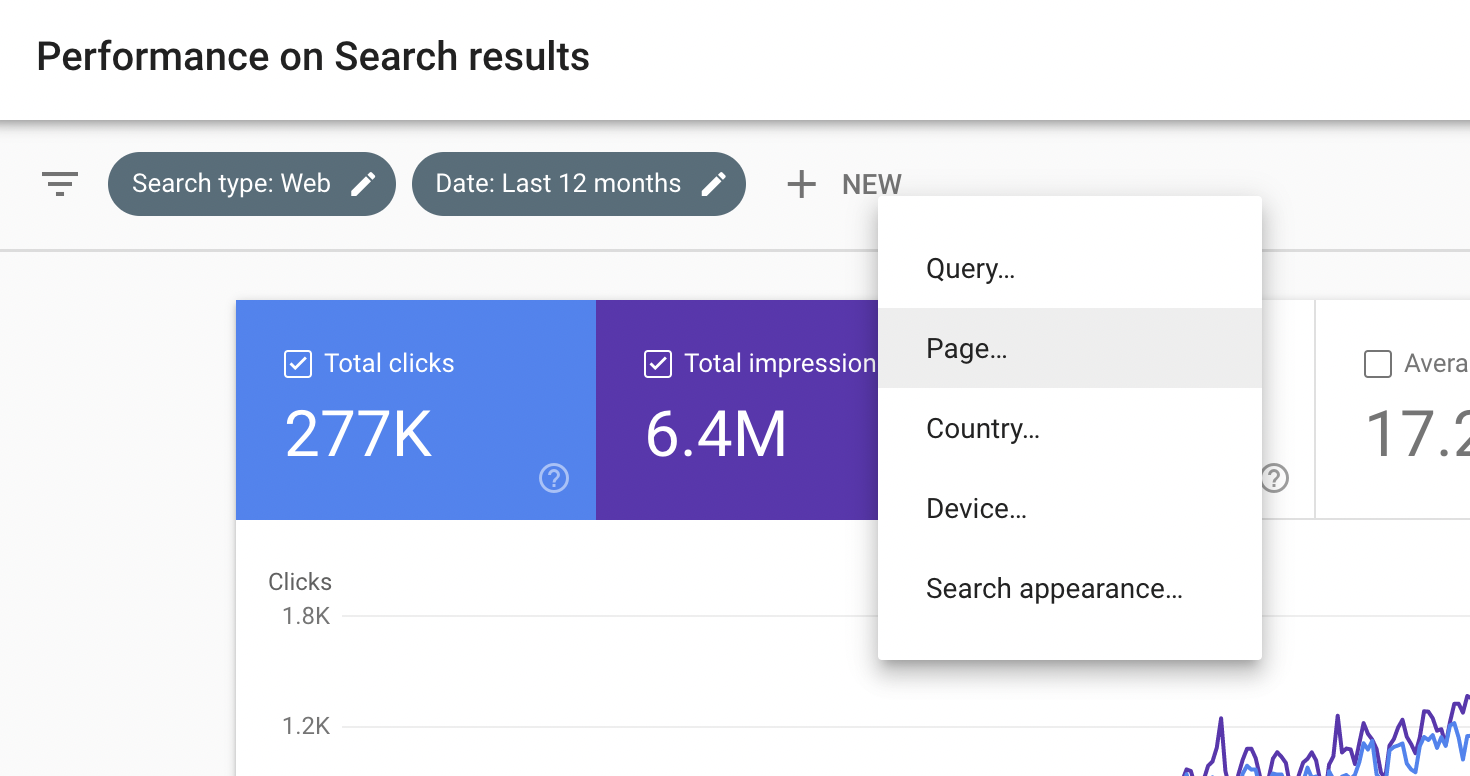
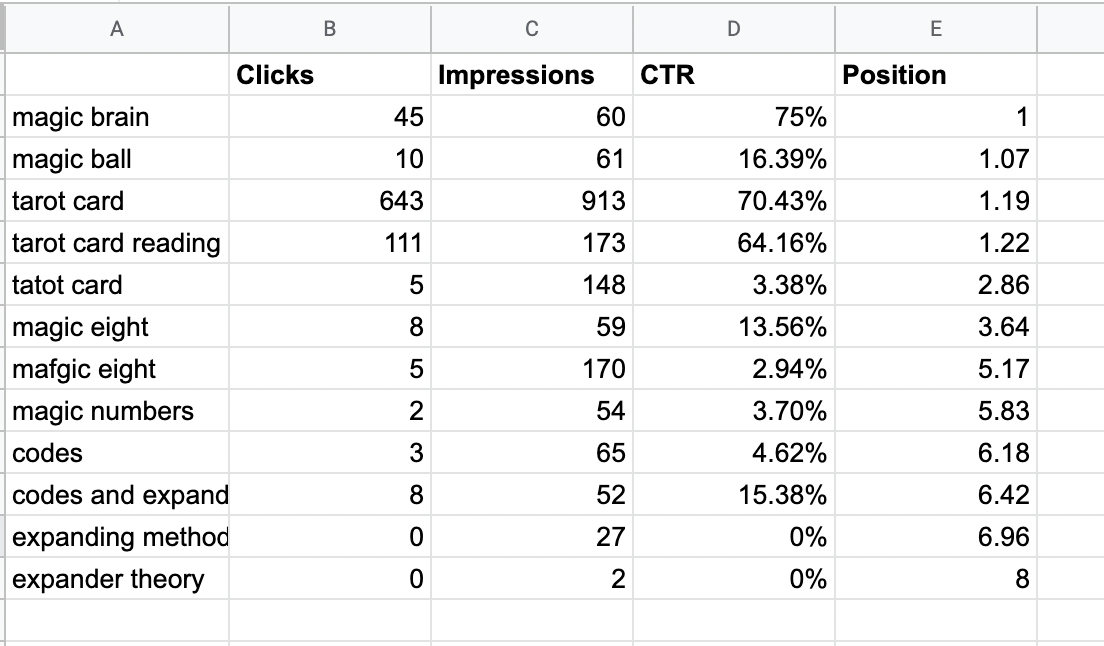
This average position will tell you where your page is ranking across all queries, but you can also then scroll down and look at the Queries section to see exactly which queries that blogpost is ranking for. You could then export the keywords into your spreadsheet to add more flavour to that blog post. You can also play around with the difference between impressions vs clicks for each blog post.
For example, if a blogpost was receiving a huge amount of impressions, but hardly any clickthroughs, that would tell me that the content is relevant but the title or meta description isn’t encouraging people to clickthrough from the search results page. On the other hand, if the post was receiving a huge number of clicks but not many impressions, I would wonder if there is low search volume (but high engagement) for that key term. Alternatively, it could be that there is huge competition and so my post isn’t being shared that often in a good position by Google.
7. Make decisions based on your content audit
The entire point of a content audit is to help you to make decisions on what to do with your existing content, and what you need to add. Once all of the research has been done and you’ve collated all of your findings into your master spreadsheet, you can begin to make decisions on the structure of your website going forward and how to organise your content. Here, I’d be looking at a few different angles:
What content is missing?
Hopefully from your content audit you have been able to identify gaps where you don’t have content for the key terms you think your audience would be searching for. Then you can build new blogs or pages for those key terms.
What content is low-performing (and what should I do with it?)
For low-performing content, you will usually either want to improve the content, merge the content into a similar blogpost or, sometimes, kill the content because it isn’t adding anything to your website or customers. It takes a brave company to kill off low-performing content but, trust me, your website (and your business’s energy!) will feel so much better for only keeping the material that actually works for your business.
What content is “quick win”?
With any content audit, you should always be thinking about minor improvements or changes you can make that would help to improve your content and ranking. For example, do pieces of your content have poor meta descriptions? You can easily get those updated. Is there a really out of date blog that’s ranking in position 12 which you could refresh and boost to position 9? Look out for your quick wins and then prioritise whether you want to achieve those, or start from the point of creating new content.
All of these options can be added to your “Website roadmap” tab, helping you to see the tasks that need to be completed so you can decide how and when to resource them.
Over to you
Now it’s time for you to get into these tools and create your own content audit! If you need further help optimising your website or blog for SEO and would like some personalised support get in touch.